How To: Make Your Own Vinyl Toy/Sculptures
Sol Nte, a polymathic artist and thinker from Stoke-on-Trent in England, makes toys under his FIGUREPUNK label. Here he tells us how to do this yourself: read on and get your hands on some Sculpey and a Chinese dictionary.
What type of toys does this DIY guide cover?
This DIY guide covers the production of soft vinyl figures.
What is a soft vinyl figure?
A soft vinyl figure is a hollow toy figure made of soft PVC. The simplest everyday example of this type of figure is a rubber duck. Soft vinyl figures normally have fairly simple details, they are produced by a process called rotocasting. Rotocast figures are made by putting a small quantity of plastic into a steel mould and then spinning it very fast so the centrifugal force forces the plastic into the details on the walls of the mould but leaves the middle of the mould clear thus producing a hollow figure. Rotocasting is cheaper than other plastic casting methods (e.g. injection moulding) because it uses less plastic since the figures are hollow, this also makes the figures more lightweight and reduces the cost of transporting them. This low-cost method of toy production is ideal for people who want to make small quantities of toys at affordable prices.
I have a short attention span, can you quickly summarize what I need to do to make a soft vinyl figure?
All toy figures are sculpture. You can sculpt your figure out of polymer clay, paint it exactly how you want your finished figure to look, then send that to a toy factory in China. They will make a rotocast mould from your sculpture, cast it in vinyl and then paint it just like the one you sent them. Once they’ve made the mould they can produce as many or as few of your toy as you wish.
Hang on, there must be more to it than that?
No, there really isn’t.
Well, why aren’t more people producing their own toys?
Well, the two barriers are money and the accessibility of factories, also not that many people in the world dream of producing their own toys. The cost of making a figure can be as expensive or as cheap as you make it depending on the complexity of your design; the simpler the design, the cheaper the cost. The cheapest production costs for soft vinyl figures are similar to the cost of putting out a limited CD independently, the kind of thing punk bands have done for years. That’s really how FiGUREPUNK came about, the idea of putting out the cheapest possible soft vinyl figures that have interesting designs and are limited to a few hundred rather than being mass-market items. The hard bits with doing FiGUREPUNK was finding a factory to manufacture the figures and then saving up the money to pay for the manufacturing.
So what’s next? I’d like a bit more detail on how to make my own soft vinyl figure.
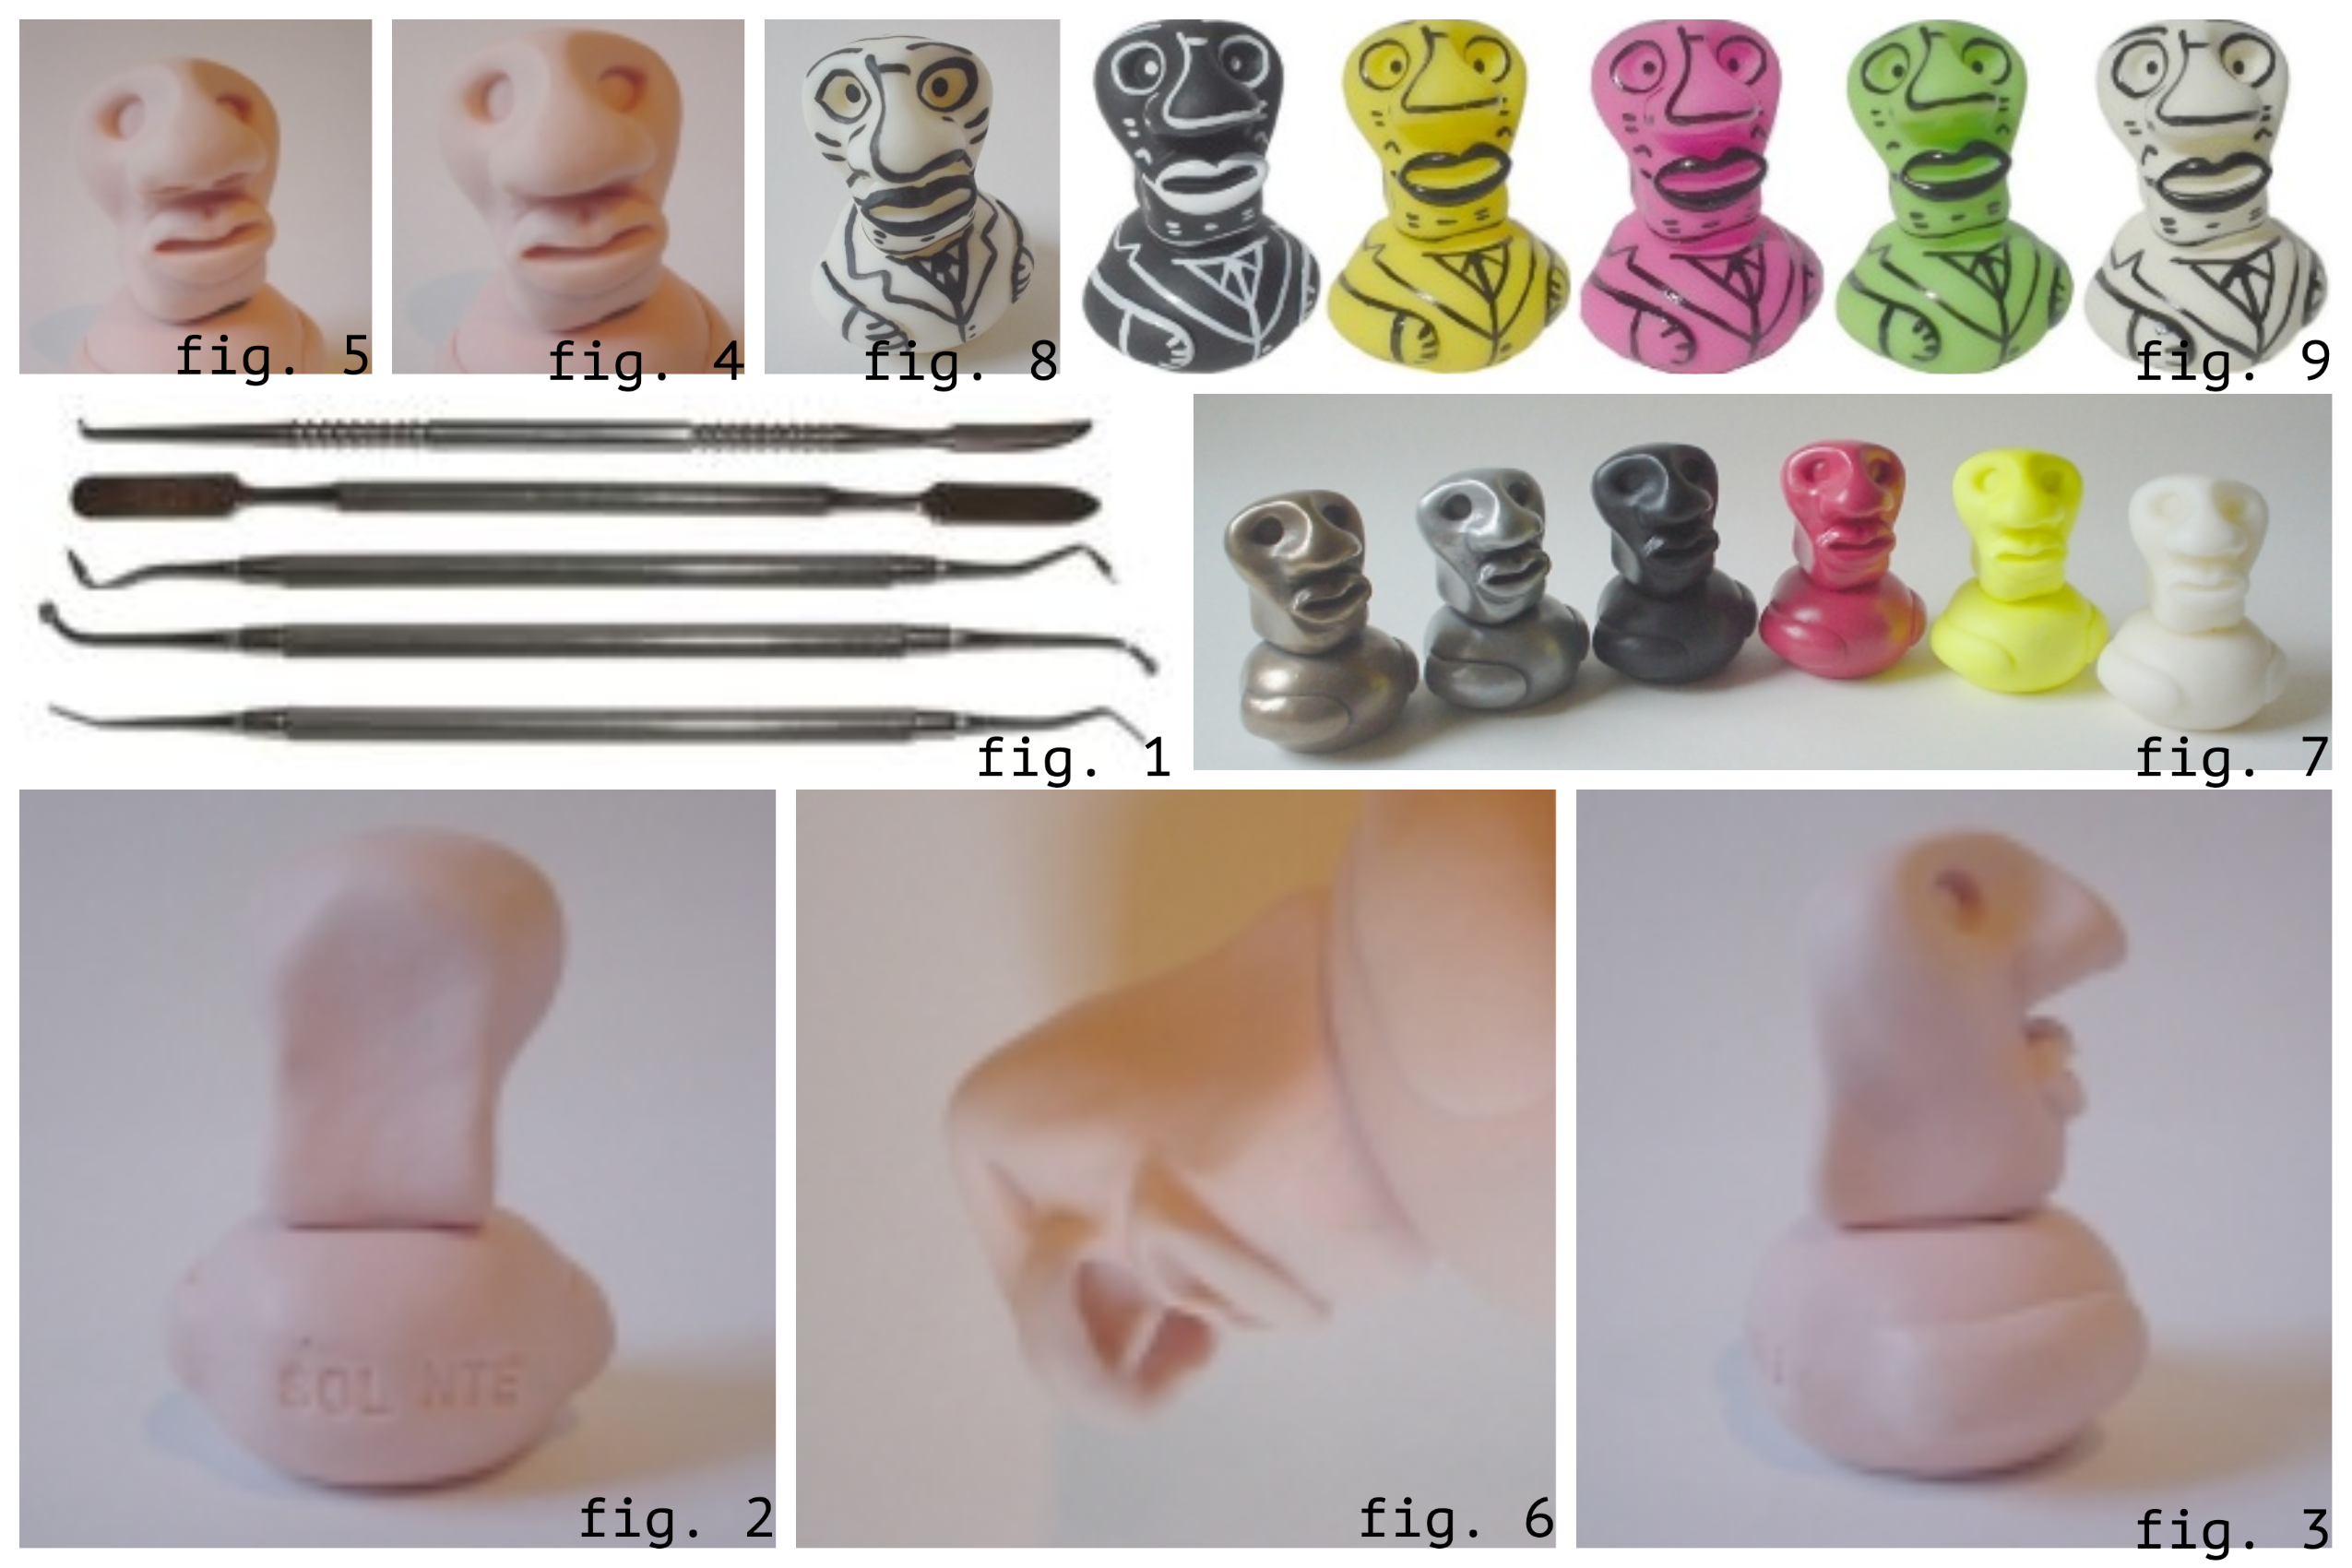
Okay. Every figure begins as an idea in its creator’s head. As I said, all toys are sculpture so in order to make your own toys you need to do some sculpting. Some of the current designer vinyl figures you see are produced by the designer sending a turnaround sketch of a figure to a sculptor who then sculpts the figure to be sent to the factory; however, this means you have to pay a sculptor to turn your drawing into a figure plus you don’t get the satisfaction of seeing your own sculpture reproduced in plastic. So forget that, you’re going to sculpt the figure yourself. You’ll be working in the cheapest, easiest, and most accessible sculpting medium: polymer clay. There’re two main brands: Sculpey and Fimo. Most art shops will have one or the other. Generally Fimo is easier to get but Sculpey is exactly the same to work with. Now go to your local art shop and buy some polymer clay. Get a few blocks as you’ll probably be having quite a few attempts before you make something you like. You also need to buy some modelling tools: Get a set of dental tools like the ones in figure 1.
You can get these from
http://www.tiranti.co.uk but there are doubtless other suppliers closer to you. Try searching the web for similar suppliers.
You’ll also find cocktail sticks, safety pins, teaspoons and other household items useful for sculpting your creations.
I’ve never sculpted anything in polymer clay before. Is it hard?
Like any creative activity, it takes practice but it’s a very easy medium to get started in. Polymer clay is also designed for children to make small animal models, etc., so it’s very easy to shape it.
What’s the best way to begin sculpting?
It’s important to remember that you don’t have to be the world’s greatest sculptor to produce cool figures. People like toy figures that are brightly coloured lumps of plastic shaped like fun-looking characters. Your points of reference are pop art and cartoons rather than Michelangelo. Basically anyone can sculpt a toy, don’t worry if you’ve not made anything artistic before. As Joseph Beuys said, “Everyone is an artist,” so you’ll be fine. The best way to start is to just take a lump of clay and try to make it into something. You can make a sketch first if you’re stuck for ideas but the best way is to just start. You’ll be amazed what you can come up with. The beauty of creative activity like this is that there are no rules. Yes, there are a few techniques that different sculptors use to create certain effects, but with plenty of practice you will develop your own techniques and style too.
So how do you turn a polymer clay sculpture into a vinyl toy ?
Okay, I’ll talk you through the process by looking at how I created Mashboy.
First of all I created a sculpture of Mashboy in polymer clay. I used Puppen Fimo but you could also use Sculpey or Fimo Classic (or even Fimo Soft, although this can be too soft in some cases). See figures 2 – 6 for a few pictures of Mashboy when he was still just a polymer clay sculpture.
Next I wanted to see what Mashboy would look like in different colours as I knew I wanted to vary the base colour of Mashboy to produce several different versions. To do this I had the original Mashboy sculpture cast in resin. I used a local company to do this as I don’t have the facilities at home to work with resin. You can do resin casting yourself at home but you need good ventilation as resin can be harmful to health if the proper precautions aren’t observed. There are plenty of websites with information on how to do this. If you decide to get a company to do it it’s not particularly expensive and you have the advantage of people with years of experience who can produce a perfect cast first time. See figure 7 for a picture of Mashboy resin casts in various colours. As you can see this phase of prototyping gives a very good idea of what the eventual figure will look like.
Finally I painted one of the resin prototypes with the paint scheme I had decided upon (figure 8).
I just used ordinary enamel paint to do it. I had been thinking about it for a long time so I just painted the design straight on. Of course many people find it useful to sketch out their design first. You will find that as you create more prototypes like this you will develop working methods suitable for what you want to do. Once I got to this stage I just left the prototype around on display for a few weeks. I tried displaying it with my toy collection and just generally seeing whether I felt it was a good design. I should add at this point that I’d already made a number of resin prototypes like this and gone through the same process of display and contemplation with them. Because Mashboy had quite a different visual style compared to current vinyl toy trends it took me a while to decide whether it was suitable for production. Once I’d decided that Mashboy was suitable for production I contacted a few factories and eventually found one I liked from www.ebigchina.com .
When contacting a factory you should be looking for somewhere that gives you a project coordinator who you will liase with during the manufacturing process. Make sure that the factory replies promptly to all your emails and doesn’t ask you to pay all the production costs in advance. In the first instance send the factory a photograph of your completed resin prototype and ask how much it will cost to produce it; at this stage state how many toys you want to produce and the packaging option you require. You should receive a cost breakdown into tooling costs (the mouldmaking process) and a unit cost per figure which will normally include painting and packaging. At this stage you can always pull out if the cost is too expensive or else modify your design to lower the costs. Once you are happy with the price you send your resin prototype to the factory. They will check it and if everything is okay they’ll ask you to pay the tooling costs so they can go ahead and make the mould. You should be aware that due to the tooling process the size of the final toy will be 5% smaller than the size of your prototype; because of this your prototype should be 5% larger than you intend your toy to be.
After the factory finishes tooling they will send you some test shots: These are toys cast in the mould they’ve just made and painted with your design. At this point if you’re not happy with the toy you can stop the project or ask for changes to be made. Be aware that it is best to make sure you are totally happy with your prototype before you send it for tooling as you should then be happy with the test shots. Once you’ve received the test shots you’re happy with you tell the factory to go ahead and make the figures. At this point you’ll pay for the production of the complete packaged figures. You may want to make a small quantity at first in case you want to change something about the design later – all this can be negotiated with the factory. A good factory will always answer your questions and tell you about every available option.
Okay, so see figure 9 for the finished Mashboy, just like you see for sale at FiGUREPUNK.
Sol Nte, Stoke-on-Trent
© FiGUREPUNK